


In the “outdoor” discipline, things are the other way around: there are many climbing knots but each is often used for just one purpose. This includes knots for anchoring guy ropes or hanging up a hammock. These types of knots are useful and practical but rarely will your life depend on them. Your life won’t be in danger if you don’t re-thread a loop.
DISCLAIMER
The overall handling at the described stages of a tour is only alluded to in this blog. It’s not enough to just know the knots in isolation without understanding the context of the techniques and situations. Learning the knots only makes sense if everything is considered. This article can only be a starting point or a refresher and ideally encourages you to find out more from courses or books.
Basic terminology relating to knots and knot anatomy
Speaking of loops: we should briefly explain the definitions of the parts of a knot so you’ll clearly understand the descriptions for tying different knots. In the cumbersome but precise Wikipedia language, a loop within the sense of rock climbing knots, is “a fixed eye (o-shaped part or full circle) in ropes and webbing that does not loosen or tighten and pulling on the rope does not cause the loop to slide or shrink.”
The old Alpine Trekker is getting involved: “You can tie knots with many things. Rope, wool, telephone cable, slings, string… the list is endless. This blog, however, is about rope, slings and cords used for mountain sports.”
Noose
In technical terminology, a noose is “a loop at the end of a rope in which the knot tightens under load and can be loosened without untying the knot, like in the hangman’s knot. If you thread the working end through the loop in the rope, you get the easiest noose – there is no differentiation in common speech.”
The old Alpine Trekker explains: “An easy way to remember is the phrase ‘the noose is tightening’. It actually means that a situation is getting more tense but it can still help in this case.”
Then there is the bight, a “U-shaped section of rope” that is known as a (half) hitch when it runs around a fixed piece. Not as a “turn” as I referred to above to prevent overwhelming technical jargon. We’ll have enough of that coming up.
Two ways of tying climbing knots
You should also know the two ways of tying knots: tying a knot with an end or in the bight. A knot is tied in the bight when you double up the rope into a bight and then tie the knot using the double rope. An offset overhand bend that is tied anywhere in the rope therefore creates an offset overhand bend on a bight. The other option is to thread and knot the end of the rope, sewn runner or cord as a single strand.


Differentiating between single and double knots is also important. Simply tying a rope with an end always initially creates a single knot (single figure eight, single offset overhand bend etc.) which, in many cases, gets a second strand by re-threading in the opposite direction, thus creating a double knot (double figure eight etc.).
Small issue with climbing knots
Many knots were developed in different places and at different times for various purposes. Therefore, there is some linguistic confusion about the names. One specific knot can have as many different names as there are applications and sports where it can be used. The bowline used by mountaineers, for example, is called “Palstek” by sailors.
The fire service calls it loop knot and for scouts, it’s a rescue knot. As for the German Federal Agency for Technical Relief, they refer to it as an anchor knot. But if you ask climbers for an anchor knot, they will tie a completely different thing. If you ask climbers for a fisherman’s knot, you will get something different compared with what a sailor would tie. This linguistic confusion also works the other way around: one name for several knots.
The old Alpine Trekker is getting involved: “We should basically just get one thing straight at this point: we’re only talking about knots for mountain sports. Climbing knots, knots for mountaineering etc. So we’re just using those customary names.”
Important knot-tying rules

The fact that knots have to be flawless when used away from safe ground is logical for any layperson. Don’t get distracted when tying knots, even when tiredness, stress and time pressure creep in. Cold fingers and darkness are no excuse. Either you do it right or you put yourself and others in danger.
How to tie a knot
A knot should always be securely tightened and checked afterwards (partner check). The remaining rope ends, sewn runners or cord ends must always be long enough so they don’t slip through the knot: 10 cm is considered the minimum. For some knots, such as the double bowline as a tying-in knot or the Marline spike hitch as a climbing stopper knot, you should always tie an additional offset overhand bend as a belaying knot around the opposite rope strand with the end of the rope to prevent accidental loosening.
Tip from the old Alpine Trekker: “If you can’t picture 10 cm, just think of a hand width.”
Climbing knots for mountains and rocks
Those who are alone in the mountains and crags must know a handful of knots and how to tie them. For a smooth trip, very few knots are actually needed. But as soon as there are unplanned difficulties or even accidents, additional knot knowledge is indispensable.
In the event that a lead climber falls during multipitch route touring and can no longer move independently, you should know how to secure this person. You should also be able to secure a poor sod who just slipped into a crevasse before you get pulled in as well. You don’t need knots in addition to the few standard knots when rescuing someone from a crevasse. However, you should know how to tie a Prusik knot with an end. In general, it’s only ever tied in the bight. Of course, you can work out how to tie it with an end by looking at it but in a stressful situation, this may take too long or go wrong altogether. So better get practising.
What types of climbing knots do you need for a climbing trip?
Arranging knots by type or use is difficult as well as confusing because of the many overlaps. To gain some basic understanding, it’s certainly useful and correct to be able to differentiate between tying-in knots, joining knots, knots for securing oneself and others as well as friction hitch knots. But this will not prevent the selection of the knots and the order of their presentation seeming haphazard.
An alternative that can be remembered is chronological – from the start to the end of a climbing trip.
Double figure eight and double bowline – important knots
The order and selection of knots when starting the climb is obvious: you’ll need the first knot to tie in. As a tying-in knot during climbing, you use a double figure eight with an end or a double bowline with an end. The figure eight is clearer and can therefore be checked by your partner more easily. It’s also faster to tie. However, when it’s subjected to load by pulling or hanging on the rope, it tightens significantly and is then difficult to loosen.
The single bowline was banned from climbing in the 1970s because it would sometimes open up when the rings were subjected to load. On the other hand, the double bowline is extremely secure, it doesn’t tighten even under extreme load and can therefore be opened easily (but not by accident!). The size of the noose formed by the bowline can also be adjusted more easily.
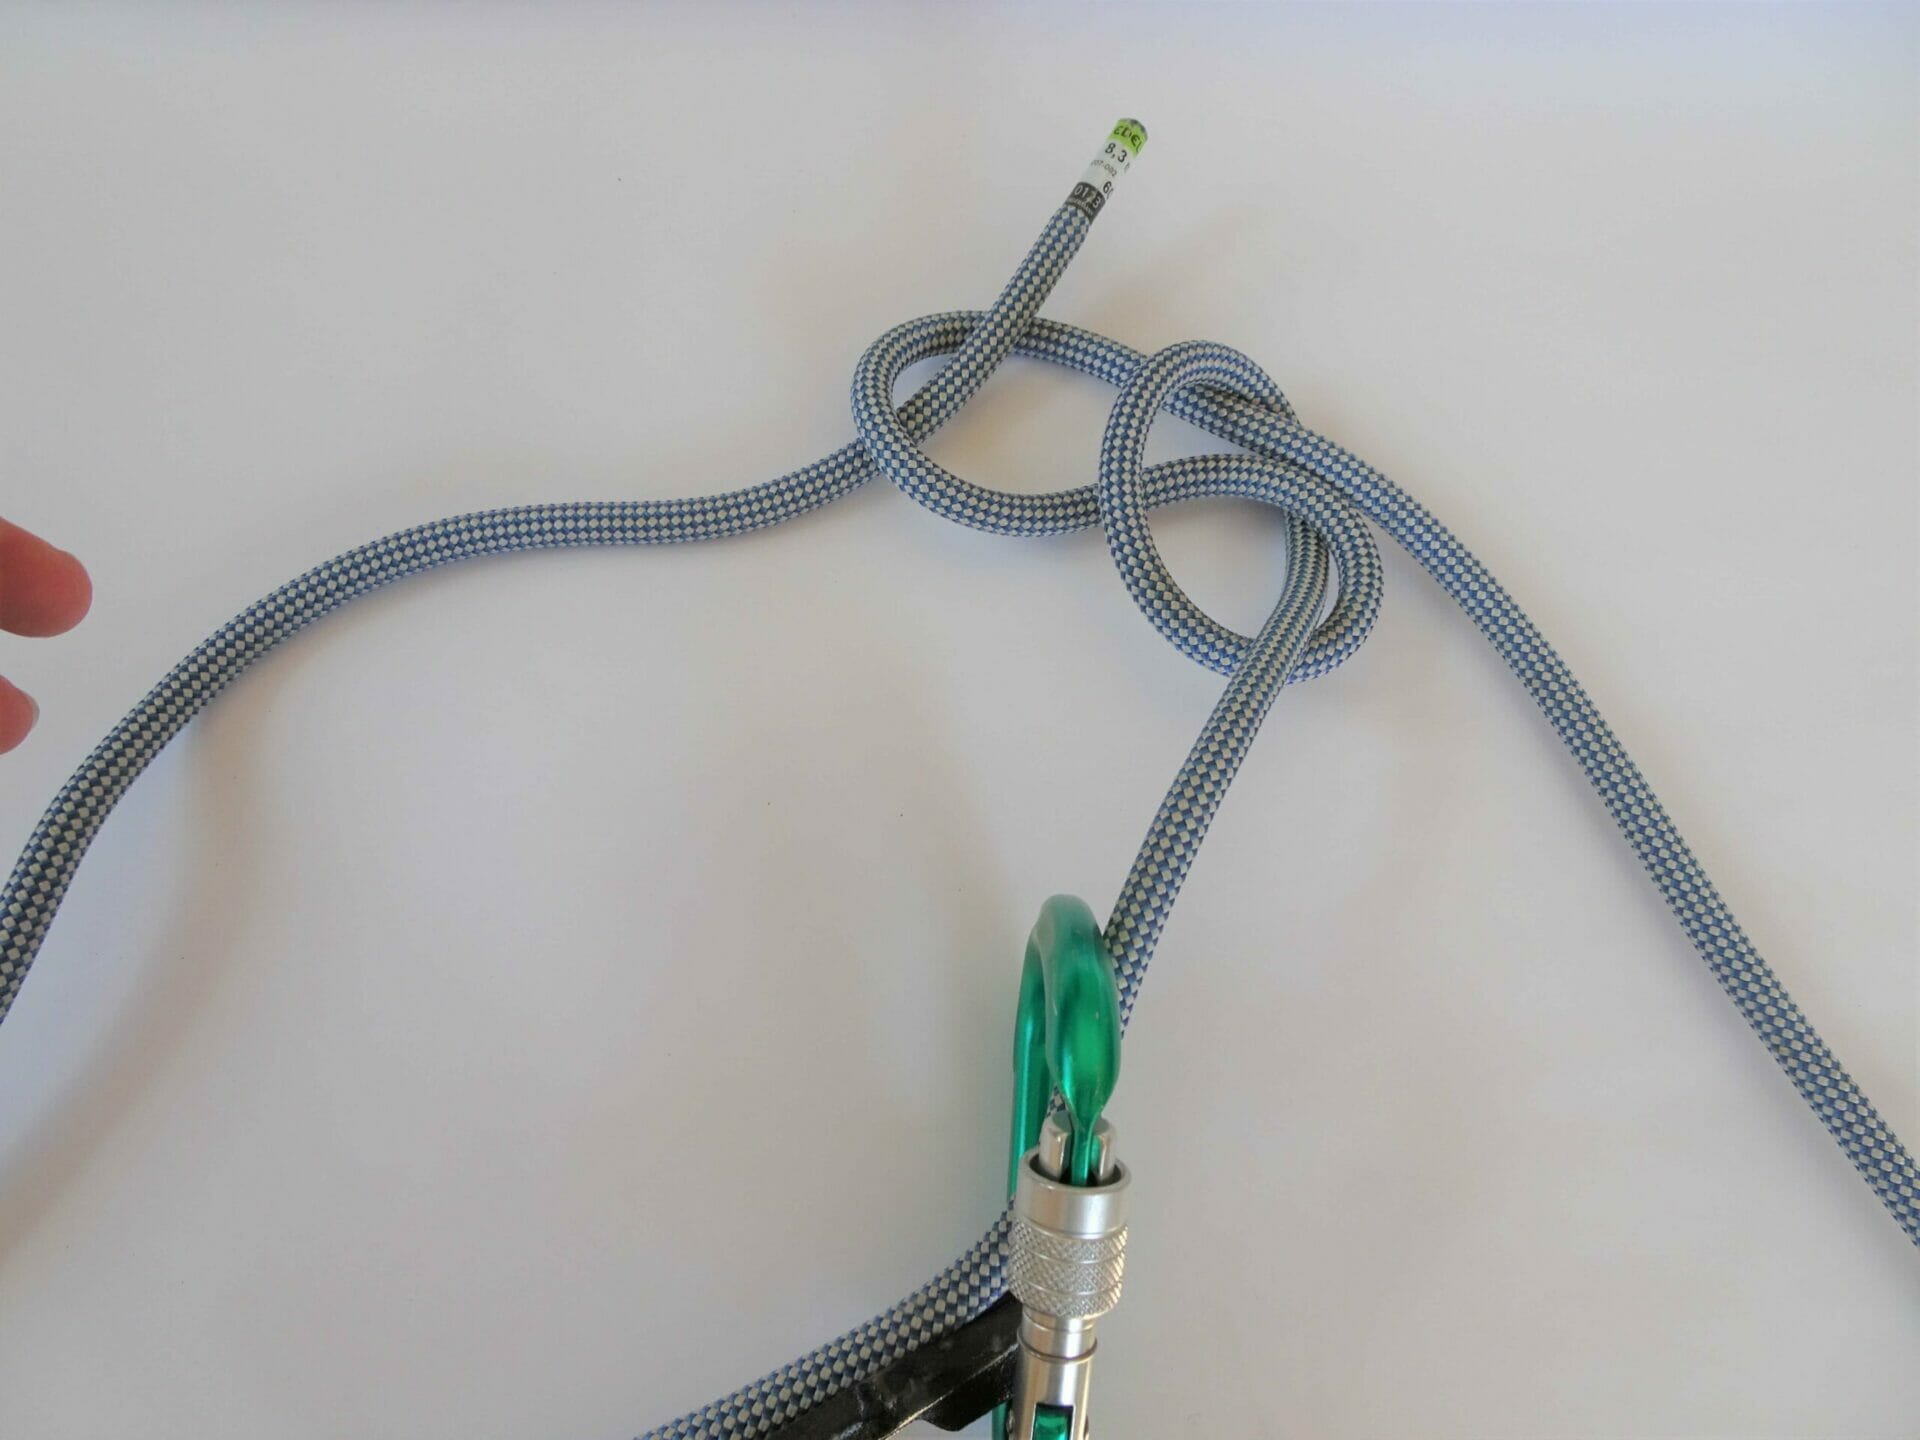
Climbing knots figure 8, for tying in:
Fold the rope into a bight about 1 m away from the end of the rope, then twist it twice in this spot around the opposite strand. Now pass the end through the loops you have created and pull it out. This creates a single figure eight with a remaining rope of about 60-70 cm. Pass this through the tie-in-loop of the climbing harness (this is a carabiner in the picture), then pass it back in the opposite direction parallel to the single figure eight. Tighten the double figure eight well, with the remaining rope having a length of at least 10 cm towards the end of the rope.
Tip from the old Alpine Trekker: “If you tie in with the figure eight, it’s important not to make it too big. The loop should be quite small, too. If this is not the case, the knot can hit you in the face if you fall. This can result in a bloody nose or a black eye.”


Bowline with an end, for tying in:
The rope is passed from above through the two strap loops that support the tie-in ring (this is a carabiner in the picture) until the rope end is just below the knees. Now hold on to the rope above the strap and form a loop. Pass the rope end dangling by the knees through this loop. Twist it once around the strand leading to the middle of the rope, then pass it back down through the loop. From here, simply follow parallel to the course of the knot you’ve already created in the opposite direction until the working rope end runs exactly next to the strand leading to the middle of the rope.


Sidebar:
For mountaineering or glacier tours, you used to secure yourself to the rope using an offset overhand bend and screwgate carabiner. Nowadays, you tie a figure eight into the screwgate carabiner (which mustn’t be a twistlock because this can twist open!). As a provisional solution in the event of material loss or if you need to be able to shift your position on the rope quickly, you can tie in to the rope that is positioned around the tie-in-loop of the strap as an anchor knot. To do this, swing the rope around your own body once in one motion similar to rope jumping. On via ferratas, the anchor knot is also used for tying in or securing the via ferrata set on the strap.
Tip from the old Alpine Trekker: “We have a separate Base Camp Blog for going on a via ferrata. It also explains how you can tie in to the via ferrata set.”
Offset overhand bend:
All those who are able to tie their own laces are also able to tie an offset overhand bend. You form a loop with the rope and pass the working end through it. The offset overhand bend has many uses (tying in, joining ropes, attachments…). Depending on the load, it can be difficult to open. Plus, it can loosen inadvertently. If the offset overhand bend is used for tying in, for example, it’s tied double following the same principle as the figure eight.
The old Alpine Trekker knows: “The offset overhand bend has many names in common speech, such as “pretzel or housewife’s knot”. The offset overhand bend is definitely the standard knot in everyday life with everyone having tied it without even knowing that it was an offset overhand bend.”


During the first few metres of starting the climb, you’ll secure your companions. To do this, use the Munter hitch belaying knot (HMS). It can now be replaced completely by various stopper devices but you should still be able to tie it because it has many uses. And if someone has to be rescued/retrieved or the stopper device may have accidentally fallen down, you’ll be quite lost without knowledge of the HMS. The HMS should be used in connection with HMS carabiners because handling will otherwise be laborious and the rope may become very twisted.
HMS on a bight:
Form two “mirror-image” loops in the rope, then fold them around each other. Hang the HMS carabiner into these two loops. It’s important that the knot can turn down when the rope is moved. This means you can release rope (e.g. during lead climbing) as well as retract it (e.g. during second climbing).
Additional information from the old Alpine Trekker: “You can probably do an HMS knot in ten different ways. Everyone will have their own trick. You also have to bear in mind whether you prefer to hold the brake rope in the right or left hand. You then have to tie the knot the corresponding way around. It’s also important that the brake rope runs over the rigid side of the carabiner, not over the gate. It may otherwise open by accident despite the screwing mechanism.”


Sooner or later, the lead climber will arrive at the first intermediate protection point. If this does not consist of a comfortable bolt, using an anchor knot, you can secure sewn runners and cords on a fixed metal ring, an hourglass formation in the rock or a material loop that doesn’t open. You can also use it to “tie off” hooks that protrude from the rock. In this case, you hang the climbing rope into the sewn runner used for tying off instead of into the hook eye. This prevents unfavourable lever action in the event of a fall.
Anchor knot on a bight:
The sewed sewn runner or cord tied into a ring is placed around an hourglass formation in the rock (or a small tree or…) (again, a carabiner is used in the picture). You then pull one end of the sewn runner through the loop on the side, pulling until the anchor knot is tight.
The old Alpine Trekker is an expert: “If the anchor knot is made with a sewed sewn runner, you have to make sure that the seam is not part of the knot because it cannot be tightened properly otherwise. The seam is too rigid and unwieldy. It should also not be on the opposite side of the noose because it would be in the way of hanging in the carabiner. The ideal position, as in our picture series, is when the seam is on the side.”


Intermediate protection point
When creating intermediate protection points, you may need a joining knot. If you just happen to have open tubular webbing and you want to turn it into sewn runners, you have to join the ends using a water knot. This is nothing other than two single offset overhand bends with an end running parallel in opposite directions.
Practical tip from the old Alpine Trekker: “When an offset overhand bend is used as a joining knot, climbers refer to it as a water knot. In adverse conditions (for example when it gets stuck in the rock), the offset overhand bend can come loose. If you prefer to stay safe, create the connection using a figure eight knot.”


After various intermediate protection points, you’ll reach the belay station. You’ll secure yourself with a sewn runner attached to the strap using an anchor knot or with a clove hitch on a bight in the rope which is also connected to the belay point. Nowadays, belay stations are often built “in series” where you’d use a prepared belay station sewn runner with a “soft eye” that’s already tied. Similar to tying off, the double bowline forms the eye. Although, here it’s tied with an end rather than in the bight as is the case with tying off. As previously mentioned, the bowline has the advantage that the eye is adjustable but doesn’t slip.
Clove hitch on a bight:
Just like the HMS, you twist two mirror-image loops but this time, you don’t fold them over but overlap them.


When the belay station has been prepared, you’ll fetch the second climber who is secured on the stopper device or HMS knot. If this person isn’t able to proceed or has been injured, you may need a stopper knot for climbing or a hitch knot so your hands are free to help. That’s why the Marline spike hitch should be part of the portfolio of independent climbers and alpinists. The Marline spike hitch can secure the second climber and the lead climber. It can be opened when subjected to load.
Marline spike hitch:
From the hanger, a loaded rope strand leads to the climber and an unloaded rope strand to the end of the rope. Take the unloaded rope strand and form a big, twisted loop “behind” the loaded strand. Then take more of the unloaded strand, make a second, very big loop and pull it through the first loop. Use the long, free loop as a belay hitch and place it around the loaded rope strand or connect it using a carabiner. If you then let go of the unloaded strand, the Marline spike hitch will be pulled to the hanger where it locks. So, you should tie the Marline spike hitch as close as possible to the hanger and let it go slowly.


