


Contrary to what I had initially thought, building a bouldering wall (one you’ll actually be able to climb around on) requires a lot of planning and attention to detail. So, if you’re like me and have been thinking about building a bouldering wall of your own but don’t know where to start, here are some tips to help you get started.
Materials, size and construction

The first thing worth mentioning is the following: even though a small bouldering wall might look pretty spiffy, it’s virtually useless when it comes to training. At the very least, the wall should have a surface area of 6 m². But, the bigger, the better. If children are going to be using the wall too, it’s very important that the height of the wall not exceed 3 metres, since the fall height would be too high.
As for the material, plywood works great. However, do keep in mind that the plywood sheets should be 18-22mm thick. The substructure supporting the wall must be extremely strong, since it will be forced to support very heavy loads, both live and dead loads. If the boards are not directly mounted to a concrete wall, a substructure consisting of wooden beams or steel support structure is your best bet.
What your (sub-)structure supporting your bouldering wall should look like depends on several different factors. In addition to the angle, height and other factors, different wall panels require different substructures. So, what the frame of a bouldering wall should look like is hard to say.
Interestingly, all artificial climbing structures used by the public must comply with the European standard EN 12572. This standard defines the wall height, dimensions for falling space and the dimensions of the impact zone beneath. Obviously, this standard is not binding in our case, because we’re just DIY-ing it, but it is a great reference tool full of useful tips on how to build your own wall.
Here’s the most important info at a glance:
- Wall height: max. 4m (free-standing, can be climbed over), max. 4.5m (can’t be climbed over)
- There shouldn’t be any electrical cables in the falling space
- There should be sufficient falling space and impact zone to the side of, in front of and beneath the bouldering wall. You should also be sure to cushion any posts or beams.
- The falling space should be flat and free of any hindrances and sufficiently padded (with pads/mats, etc.) Plus, make sure that there are as few gaps as possible between the pads, as these could increase your risk of injury (you could sprain your ankle or wrist). As dangerous as larger gaps are, smaller ones can wreak just as much havoc on a climber. 8-20mm gaps, for example, may not sound like a big deal, but they’re the perfect size for your fingers to fit through. Yikes! Not your precious fingers!
Of course, none of this explains how many supporting beams you need for your panels, nor does it tell you how thick they should be! As was mentioned before, different materials have different requirements. In other words, it’s hard to say what you need without knowing exactly what you have to work with.
For simple overhanging climbing walls, people tend to use beams with a thickness of 10x8cm, which can be supported by laths. It’s definitely worth stopping by your favourite DIY or home improvement retailer for some advice. If you’re planning on building something a bit wilder or more ambitious, you might want to consult a carpenter as well.
If your using pre-made climbing wall panels, the manufacturer’s installation guide should give you all the information you need. The important thing is that the wooden panels are attached to the substructure, not just the laths.
The wall sheets
The grid – for the perfect distance between holds
If you’re not planning on using pre-made climbing wall panels for your bouldering wall, you’ll need to drill holes for your holds. How and where to do that is what we’re going to talk about now.
Industrially made climbing walls usually have about 15-25 centimetres between the holes, resulting in about 25 to 50 holes per square metre. If you’re doing it yourself, you might want to use a similar pattern. This will not only allow you to set different routes but also customise them as you see fit. The typical pattern is the staggered grid.
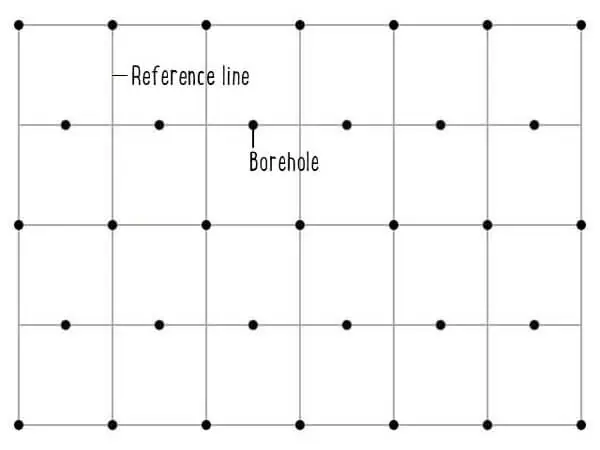
This grid is incredibly easy to make. All you need is a tape measure, a pencil and a drill. Mark all the holes for your grid on the back of the sheets. The important thing is that the holes in the top and the bottom row are far enough away from the edge and that there is the same amount of space on the left and right-hand sides as well.
Now, draw in horizontal lines across the sheet followed by vertical lines so that you end up with a checked pattern. Once you’ve finished, you can start marking the holes. For the top row, use the points at which the lines intersect. In the next row, mark the spot for the hole on the horizontal line between each of the vertical lines (see image). You can think of this point as the middle of an X. Then mark the rest of the holes in the same way.
You can also do without the grid if you’re only using screw-on holds that are secured with wood screws. These will save you loads on time, money and effort!
Painting your wall
If you haven’t done so already, it’s now time to paint the front of your sheets. If you’re just looking to brighten up your wall with a bit of colour, you can use any standard wood stain. However, if you’d like to add some texture to the wall, you need some special paint or coating:
- A paint job using a two-component anti-slip coating
For this, you use special kind of paint. In addition to the standard pigments, this paint has a grain, which makes for a rough and thus stickier surface (akin to rough sandpaper). This kind of paint should have a slip resistant rating equivalent to R11. You can simply apply the paint by using a paintbrush or a roller.
- Coat of epoxy and silica sand
This option involves mixing epoxy, which is suitable for the outdoors, with silica sand. It’s important that the mix ratio be about 5:1 and the silica sand have a grain size of 0.7-1.2mm. This mixture is then applied to the surface.
Nuts

Once you’ve drawn in your grid and painted the sheets, you can drill the holes for the nuts in the spots we talked about earlier. It’s important to note that there are two different types of nuts in the world of climbing walls:
Flange and T-nuts If your wall is intended for your own private use and won’t be unscrewed/repositioned, T-nuts are the way to go. These are affordable alternatives to flange nuts and often come with holds “for free”, as with Metolius climbing hold packs. For T-nuts, you’ll have to drill 12mm holes.
Professionals tend to use flange nuts. These are extremely strong and don’t twist after repeated repositioning, since they’re usually secured by small screws on the back. Plus, larger holes (14 mm in diameter) have to be drilled for flange nuts.
Once you’ve drilled all the holes, flip the board over and stick the nuts in and secure them. When installing T-nuts, it’s a good idea to “pull in” the nuts tightly using the very same bolts (M10) that are supposed to keep the holds in place.
When drilling the holes, you can put a piece of wood on the back side of the board to prevent the wood splintering when the bit goes through the other side.
Raise the roof
Once the wall panels are finished, they can be attached to the substructure you’ve already installed. For metal substructures, you can’t go wrong with nuts and bolts. If you’ve got wooden beams, your wall panels can be secured using standard countersunk wood screws. And don’t be afraid to go all out! It’s really important to use enough screws.
Once your panels are in place, you can begin installing your holds. Since you usually start off in a sitting position when bouldering, you can install footholds only up to a height of about 60cm. Once you’ve done that, go head and start setting different holds that correspond with the type of wall you have and your own personal climbing skills.
Tip: since the size and height of DIY walls are usually limited, it’s a good idea to refrain from setting routes that go more or less straight up. If you’d like to improve your endurance, we recommend setting routes that can be climbed in a circle. That way, not only can you do multiple “laps”, as it were, but also practise down-climbing.
If you’re unsure how to set your routes, you can always ask route setters at your favourite climbing gym!


